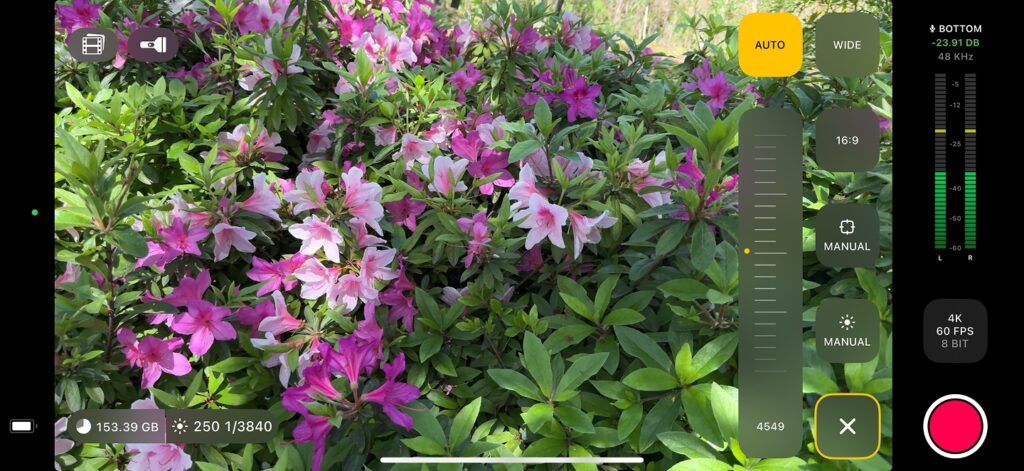
This post covers how to use the wealth of manual controls that REC gives you access to. See the image below for the location of each tool. On the main screen, each manual control will show it’s current status: “Auto”, “Manual”, or “Point”. When you open a manual control, it gets highlighted in yellow and the button changes to a close icon. Tap it again to close it.
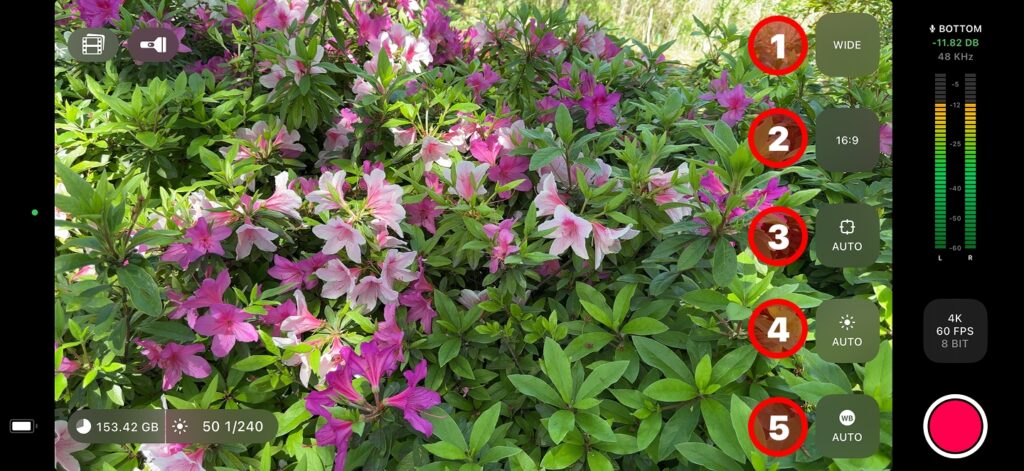
- Lens Switcher
- Aspect Ratio
- Focus
- Exposure
- White Balance
Lens Switcher
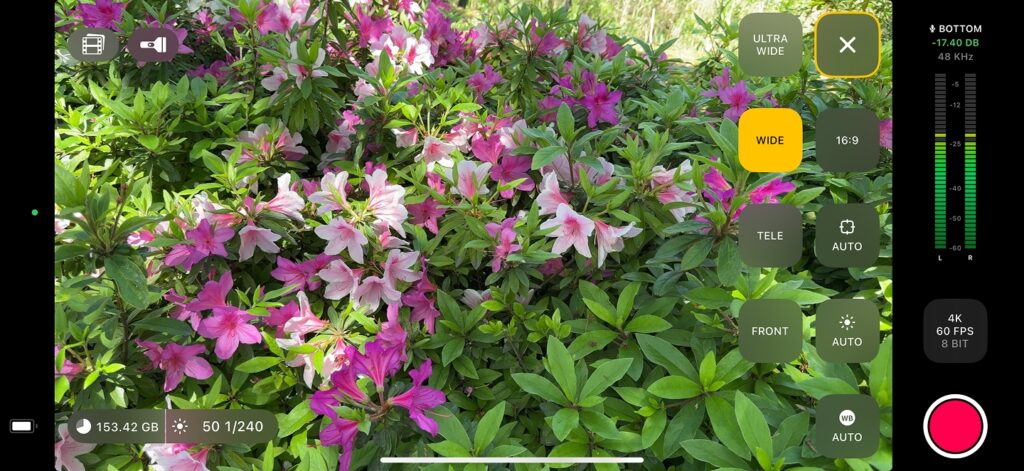
This button displays the currently selected lens. Tapping this button button opens up a menu of lenses. Available lenses are dependent on the device that you’re using and reflect the physical lenses on it. Typical choices include Telephoto (2x-5x), Wide Angle (1x), Ultra-Wide (0.5x), and Front Facing (selfie).
Aspect Ratio
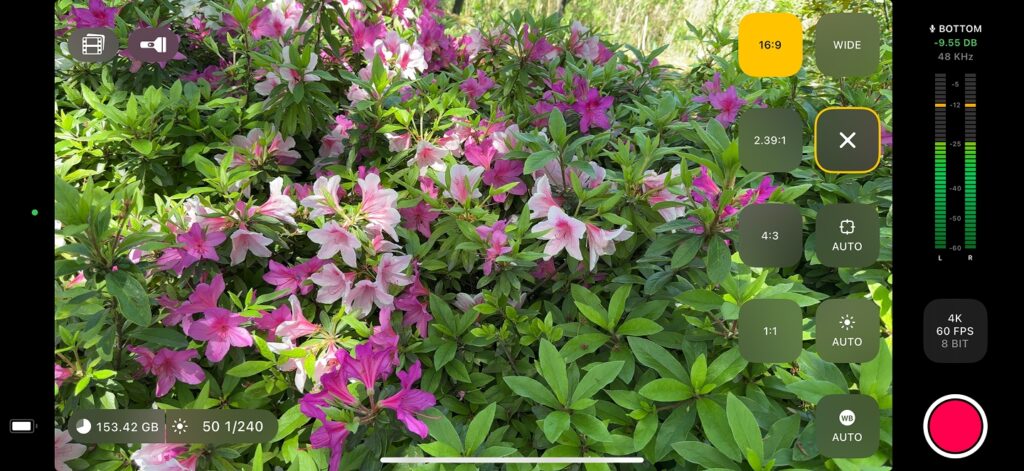
This button allows you to choose the aspect ratio of the image that is captured. The standard width:height ratio for video is 16:9, but that image can be cropped to give your video a different feel. These options include 2.39:1 for an ultra-wide cinematic look, 4:3 for a classic TV look, or 1:1 for a perfectly square image.
Focus
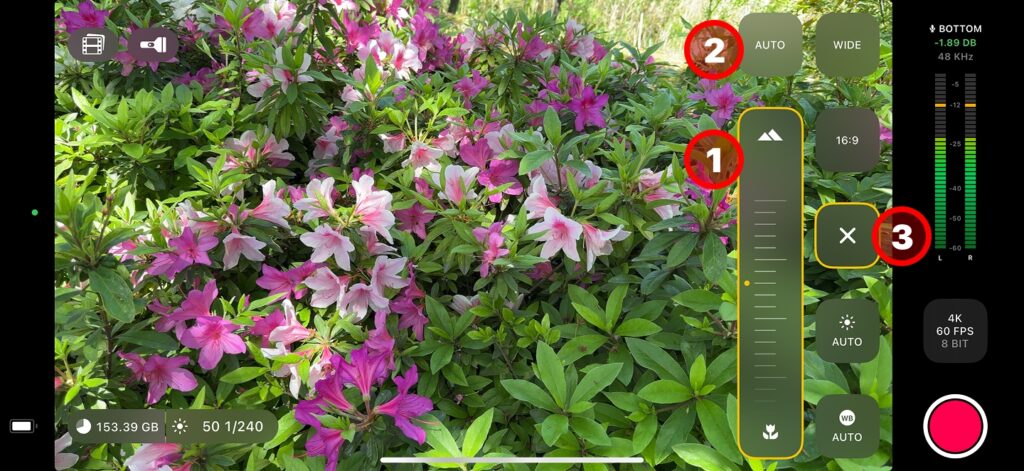
Tapping on the focus button presents you with a wheel (1) that has mountains on the top and tulips on the bottom. Sliding the wheel to the bottom will focus the camera on things closer to you, and sliding to the top will focus on things further away
You can always go back to Auto Focus by tapping the “Auto” button (2) above the wheel. To go back to the main control screen, tap the close button marked with an “X” icon (2).
Exposure
When opening the exposure control, REC gives you two options for adjusting the exposure: an Exposure Value (EV) control, or the fully manual Shutter Speed/ISO controls.
1. Exposure Value (EV)
When shooting in Automatic mode, the camera is continuously metering the amount of light captured and adjusting the camera settings to target a medium brightness level. By changing the EV, you can adjust that target brightness level, letting you make the image lighter or darker while still allowing the camera to automatically keep adjusting the brightness.
An exposure value of 0 indicates the standard level, adjusting into the negative values (down to -6) makes the image darker, and positive values (up to 6) makes the image brighter.
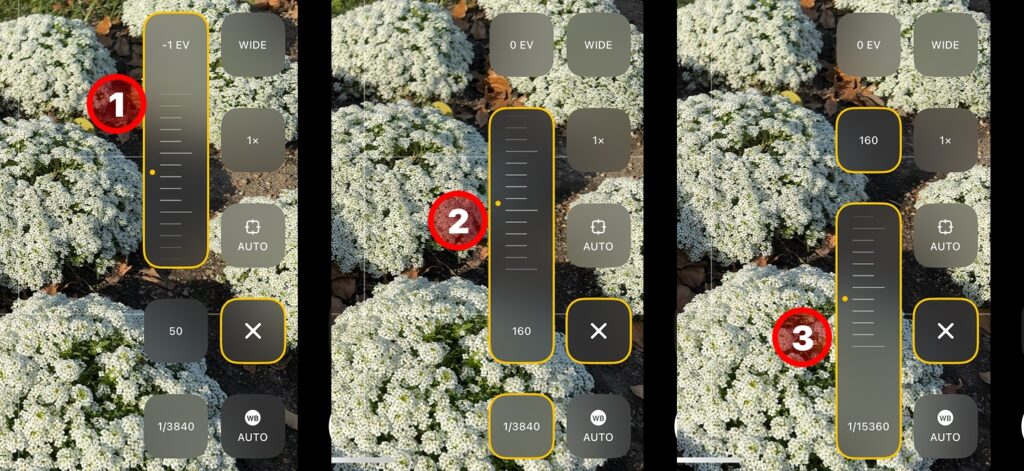
To adjust the EV, tap on the exposure control, and then tap on the EV button at the top of the screen. A wheel will appear. Drag the wheel toward the top of the range to make the image brighter, or the bottom of the range to make it darker.
Manual Exposure
The manual exposure controls comprise of a shutter speed and ISO setting, which work in tandem. When choosing either a manual shutter speed or ISO, both shutter speed and ISO are set to manual – you can’t leave only one of them in Auto.
Both shutter speed and ISO control different aspects of how your photo will look.
2. ISO
The ISO number represents the camera sensor’s sensitivity to light. REC currently supports ISO values between 50 and 3200 (although this may vary depending on the device). The higher the ISO, the more sensitive the sensor is to light. However this sensitivity comes at a cost. The higher the ISO the more noise is introduced into the video. This can make your image look grainy or blocky.
When you tap on the exposure control, the middle option adjusts the ISO. Tap on it to expose the ISO wheel. Slide it to the top to increase the ISO, and slide it to the bottom to decrease the ISO. The selected value is displayed to the bottom of the wheel, and you can always tap on the EV button at the top to return to automatic selection of ISO. Use the close button marked with an “X” to dismiss the exposure controls. The exposure button will now show “Manual” to indicate you have set a manual ISO value.
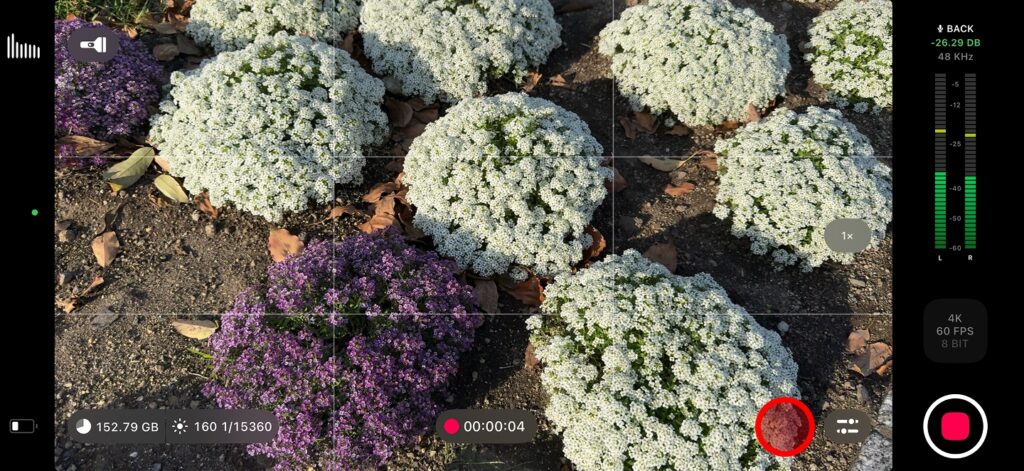
On the main screen, the current ISO value is always visible in the bottom left of the viewfinder, even when in auto mode.
3. Shutter Speed
Shutter Speed is generally denoted as a fraction of a second. The higher the bottom number of the fraction, the faster the shutter speed will be. REC allows you to choose anywhere between the shutter speed (e.g. 1/60 of a second for 60 fps video), and 1/61440 of a second on the latest devices. But what does this mean for your video? If you imagine the camera shutter as a window shade opening and closing, the shutter speed would be how fast that happens. Long shutter speeds let in more light, short shutter speeds let in less. This can have the effect of lightening or darkening the video, but it also affects things like motion. A car driving across your frame with a long shutter speed may appear like a smear in your final image, while a short shutter speed will do a lot better job of catching it in the moment.
For the most cinematic look, you want the shutter speed to to be a near multiple of the frame rate (this is referred to as the 180-degree shutter rule, from how film cameras work), and in Auto mode REC tries it’s best to achieve this, but on a bright day, it may be impossible to enforce without the image becoming too bright. In these situations, buying and attaching a physical Neutral Density (ND) filter over the camera lens can help you achieve cinematic video even outdoors.
Just as with the ISO wheel above, when you tap on shutter speed, you will be presented with a wheel. Sliding the wheel to the top makes the shutter speed longer, and sliding it to the bottom makes it shorter. As before, tapping the EV button allows you to reset it to auto. To the bottom of the wheel a fractional number will appear to let you know your currently selected speed. Use the close button marked with an “X” to return to the main screen. When you return, you’ll notice the exposure button now says “Manual”.
On the main screen, the current shutter speed is always visible in the bottom left of the viewfinder, even when in auto mode.
Point Controls
If you’re not a fan of manual controls but still want to give the camera a bit more direction, REC offer point controls for both focus and exposure.

By simply tapping on what you’d like to put in focus on the screen, REC will adjust both the focus and exposure to match the image at that point. The currently selected point is represented by a dashed square referred to as a reticle (1). The controls for both the focus and exposure controls will now show “Point” (2).
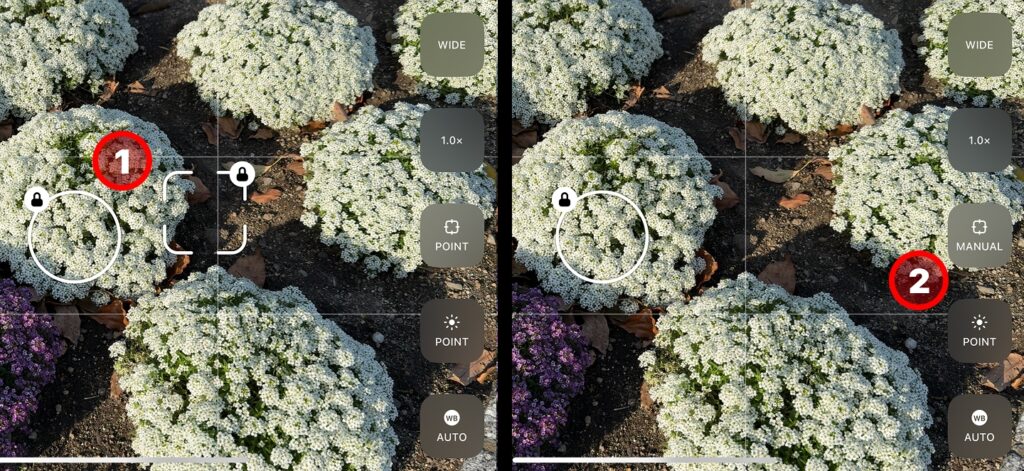
If you want the focus and exposure to be set separately, tap the plus icon next on the top right corner of the reticle. It will be replaced by separate focus and exposure reticles (1) – the focus is a square and the exposure is a circle. These can be moved around separately so that you can, for instance, focus on something nearby, but set the brightness based on the background.
If you are happy with the focus or exposure and want to lock it in so that the camera does not keep adjusting it when the subject of the picture changes, tap the lock icon in the top right corner of either reticle. The reticle disappears and the corresponding control will now read “Manual” (2).
To remove the reticles, and return all the controls from manual to auto, simply double-tap in the viewfinder.
White Balance
White balance adjusts how “cool” or “warm” your photo is. But what does that mean? Different lighting situations can make white look either more orangey/yellow or more blue depending on what kind of light it is, and the automatic white balance adjustment doesn’t always get it right. Have you ever taken a photo of your food that looked great at the time, but when you got home it came out really yellow and drab looking? Manual white balance is used to correct this and make whites “true”. Once you have something white looking correct, all the other colors should be adjusted correctly as well.
When you tap on the White Balance, you’ll be presented with a wheel that controls the temperature. Sliding the wheel to the top makes your shot “warmer” or more orange and sliding to the bottom makes it “cooler” or more blue. Once you’ve set a value, you can tap the auto button to return to automatic adjustment of white balance. The selected value appears to the bottom of the wheel, and you can use the close button marked with an “X” to return to the main screen.
After returning to the main screen, the white balance button will now read “Manual”.
Zoom
While you are recording video, you have the ability to apply a digital zoom to the video. We typically do not recommend using digital zoom as it does not actually add any detail to the video (you are just as well off cropping the recorded video while editing), but for some use cases this may still be what you want.
By default the zoom control is hidden. To enable it, tap the Settings button, and go to the “More” tab at the end of the list. Then enable the “Zoom” option, and dismiss the settings.
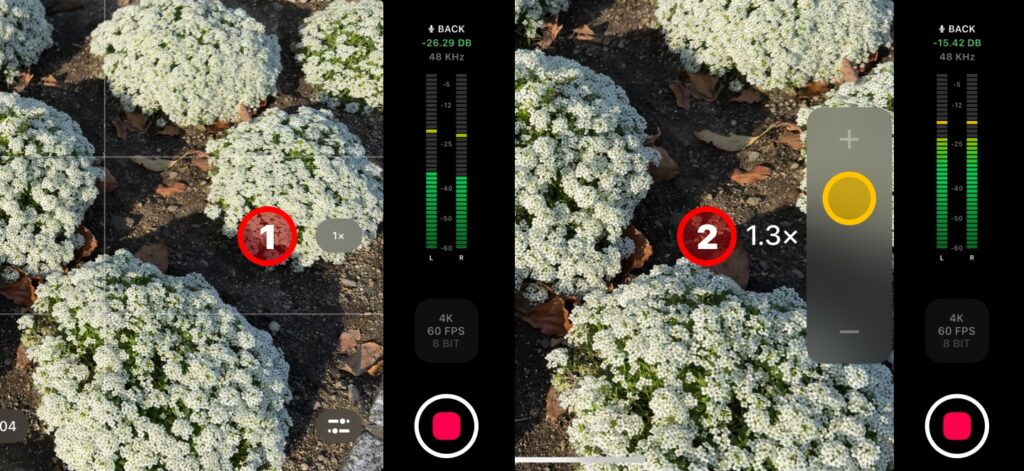
Now when recording is in progress, to the center right of the viewfinder you will see a button (1) that shows the current zoom level (by default it is 1x). Tapping this button will bring up the zoom control (2).
This zoom control mimics the behavior of the zoom control on a camcorder, allowing for smooth zooms in and out with a steady, controlled pace. Swipe up to start zooming in, with the further you swipe, the faster it zooms in. Swipe down to zoom out. Let go and the control will dismiss in a few seconds.
Aperture
Aperture, also known as f-stop or f-number, is a method of measuring how large the opening that allows light onto the sensor is. Unfortunately with an iPhone or iPad, this size is fixed for each lens. There is some software that attempts to approximate the effects of changing the aperture through post processing with varying degrees of success, but with REC the only way to change this value is to change to a different lens.
Lock Exposure and WB
By default when recording a video, the camera is continually adjusting the exposure and white balance for the current conditions. This lets you move from a dark room to the bright outdoors while recording, and the image adjusts to the available light in order to stay visible the whole time. But this is not always desirable – if you’re recording in a static environment like at a desk or in a studio where the lighting is fixed, other changes to the visible frame such as someone wearing light clothing moving into the shot may cause the camera to attempt to compensate, instead making the rest of the image darker, causing a jarring transition.
For these situations, REC has an option called “Lock Exposure and WB”, which automatically locks these settings whenever the video starts recording (and unlocks them when you stop recording), even if you’re shooting in Auto mode. This keeps your image from fluctuating while recording, while still allowing the camera to automatically adjust when you change the scene.
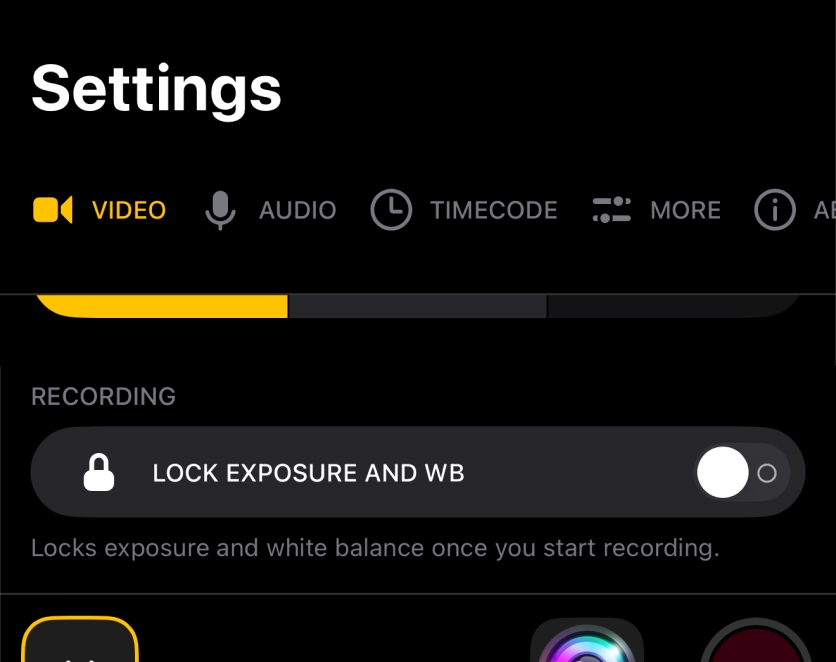
To turn this option on, tap the Settings button, and scroll to the bottom of the Video tab. Under the section “Recording”, turn “Lock Exposure and WB” on and dismiss the settings.
Hiding and revealing the controls
To fit on screen, the controls are positioned over the viewfinder, and you may find they get in the way of the content you’re trying to capture. To minimize the controls, swipe down over them, and they collapse into a small button (highlighted in the image). To restore them, tap the button.
When recording, the controls are automatically minimized. Tap the icon to bring the controls up, and swipe down on them to dismiss them again.