Introduction
While we’ve designed REC to be very simple and intuitive to use, some guidance may be helpful in ensuring you get the most out of every single feature REC has to offer. This series will cover every aspect of using REC in depth, so you can be sure you’re getting the most control over your video.
Launching for the First Time
When you first start up the app, you’ll see a splash screen. Choose “Get Started” to begin your videography journey. We’ll present you with a few things that REC can do then, if you haven’t subscribed, you’ll be presented with the opportunity to do so. Since we offer a free 7 day trial period, all information from this point forward will assume that you’re in a trial, or have subscribed to get full use of the app.
Then, we ask for some permissions. What are they used for?
- Camera
- This permission is critical, as without it, REC cannot shoot video.
- Microphone
- What is a video without sound? REC needs access to your microphone.
- Location
- This data is used exclusively for adding geotags to your videos, if that has been enabled. It will never be used for any other purpose.
Tap on each permission requested and then choose what you’d like to allow. Please note again, without access to the camera and microphone, REC will largely not be able to function.
After selecting “Continue”, you’re ready to go!
Shooting a Video
The big red button at the bottom right of your screen is the record button. To shoot a video, simply tap it! While REC gives you full manual control over your shots, it also has excellent automatic functionality. You can still point and shoot, and get some excellent videos, without ever touching anything else. But that’s not why you’re here, is it?
You can also shoot a video by pressing either one of the volume buttons on the side of your device. This is handy because other devices can trigger the shutter such as earbud volume controls, and bluetooth based generic shutter controllers.
Quick Switchers and Information
REC provides you with a wealth of information within it’s sleek, minimalistic interface. At a glance you can see and change the flash, see the remaining storage, and monitor the audio levels. Take a moment with the image below to find where each element is.
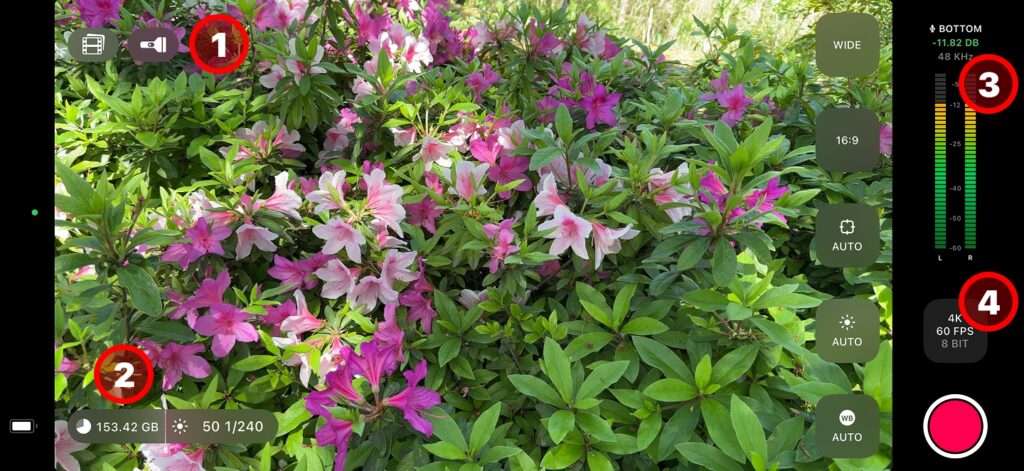
- Flash Control
- This button displays the currently selected torch setting. Tap on it to toggle the torch on and off. Please be aware that Torch Mode keeps your flash on indefinitely and will adversely impact battery life.
- Storage Status
- Video can take up a lot of space, especially when you’re shooting in 4K or with higher-quality formats. REC shows how much storage is left at a glance so you never run out during a shoot.
- Microphone Settings and Audio Levels
- The two bars on the right on the screen show how loud the audio being recorded by the microphones is. This helps you avoid the sound getting so loud it cuts off (called “clipping”) or too low that it can’t be heard.
- Settings
- You can instantly confirm your current video settings here, and tap the button to bring up the settings screen.